Kendo UI ASP.NET MVC Drop Down List inside a Grid Row

I tend to use the Kendo UI Grid in my applications far more than any of the other controls.  That is not to say the other controls are not as spectacularly engineered, because they are.  One of the many reasons the Kendo UI Grid is so powerful is how much it can be adapted to a myriad of situations.  For example, the guys and gals at Telerik made it extremely easy to embed drop down lists in grid rows.  This is super helpful when using the Grid’s inline edit functionality.


To get started, let’s build our model.  In this example I am going to be using multiple drop down lists per grid row to allow the user to select a “mode of transportation”.  In this post, we are only going to show how to get the drop downs working.  In the next post, I’ll take it one step further and turn our drop downs into cascading drop downs.

Read more

Kendo UI Grid – Persist Expanded Row

The Kendo UI Grid is one of the most versatile grids on the market today.  The flexibility and usefulness is unparalleled and thus it is a staple in my web development toolkit.  One of my more popular use cases involves providing a Grid of data, where you can select a row and “drill in” or “expand” into to see additional details.  Sometimes those details are another grid, sometimes it is simply another view.  Kendo makes this super easy and it is demo’ed on their site here: http://demos.telerik.com/kendo-ui/grid/detailtemplate


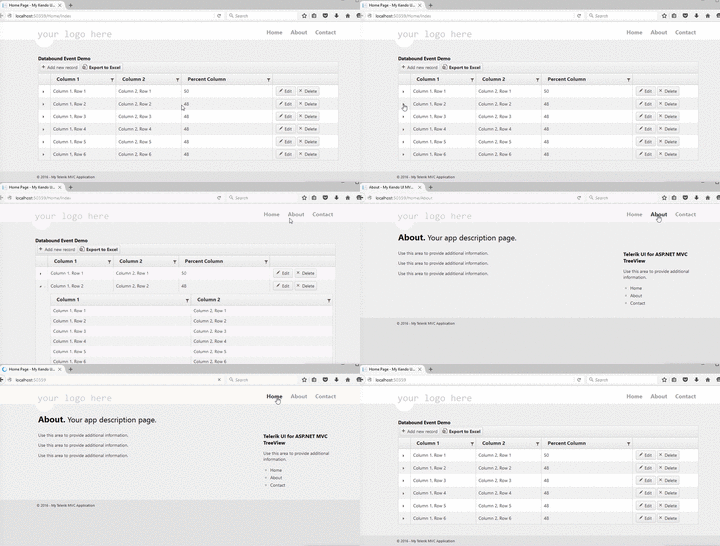
One of the most common use cases I come across using the grid consist of the following.  The user selects and item in the grid, expands the row to "Drill In" to the details.  The user then navigates away from the page and when they come back they expect the grid to be in the same state.  Unfortunately, without a little extra work this is not possible.  Out of the box, when you navigate back to the page the grid will have defaulted back to its default state with all rows collapsed.  Here is a demonstration of this in action:

Before

Here is the high-level plan of attack:

  1. Save a unique value from each record as it is expanded.
  2. Each time the grid loads, check for the value.
  3. If present, expand saved row.

To accomplish step one, we are going to need to hook into one of the many Kendo UI events.  In this case, we are going using the DetailExpand event to call some custom javascript that will grab the expanded row and post it back to our controller in order to stash it in the session.  The DetailExpand event is detailed here: http://docs.telerik.com/kendo-ui/api/javascript/ui/grid#events-detailExpand

1
.Events(events => events.DetailExpand("GridExpanded"))

Now our grid will call the GridExpanded() JavaScript function each time a row in the Grid is expanded.  This function will have two jobs.  First, grab a unique value identifying the row, then post that value to our controller.

1
2
3
function GridExpanded(e) {
$.post("@Url.Action("SetExpandedRow", "Home")", { rowident: e.sender.dataItem(e.masterRow).id });
}

There is a lot packed into this one line function.  We are using the JQuery POST function, in order to do an HTTP Post with the data back to the controller.  To get the URL we are posting to, we are using the very handy ASP.net MVC URL helper, @URL.action.  This method takes the name of the Action and Controller and returns the appropriate relative URL. We are then providing the POST a callback function to provide the data.  In this case we are posting a name value pair named rowident where the value is the id column of our grid row.  Notice we are using the sender information passed to us from the grid to get the dataItem, and then use the dataItem to get the id. In this example the id column is a unique value in each row.  This could be any column, so long as it is unique.

The JavaScript is only one side of the equation.  The script is posting the unique row value to our controller via the SetExpandedRow action.  We now need to define the action that will catch this value and stash in the session.

1
2
3
4
5
6
[HttpPost]
public ActionResult SetExpandedRow(string rowident)
{
Session["ExpandedRowId"] = rowident;
return new EmptyResult();
}

Here we are simply throwing the expanded value in the session.  You may need to persist this in some other manner depending on your requirements.

Now that we have the last expanded row value stashed in the session we need have the Grid check each time it loads it data.  If we have a selected row value, then we need to expand that row.  We will do this by using the DataBound event.

1
.Events(events => events.DetailExpand("GridExpanded").DataBound("ExpandStashedSite"))

Each time the Grid fires its DataBound event it will now execute our JavaScript function, ExpandStashedSite().

 1
2
3
4
5
6
7
8
9
10
11
12
function ExpandStashedSite(e) {
var grid = $("[id^='Grid_1']").data("kendoGrid");
var data = grid.dataSource.data();
var len = data.length;

for (var i = 0; i < len; i++) {
var row = data[i];
if (row.id == '@string.Format("{0}", Session["ExpandedRowId"] )') {
grid.expandRow("tr[data-uid='" + row.uid + "']"); // expands the row with the specific uid
}
}
}

This function uses JQuery selectors to get our Grid.  It then gets the data currently loaded to the grid and starts looping through the records.  It checks each records id column to see if it matches our stashed value which it is simply grabbing from the session.  If it matches, then it uses the grids expandRow function.

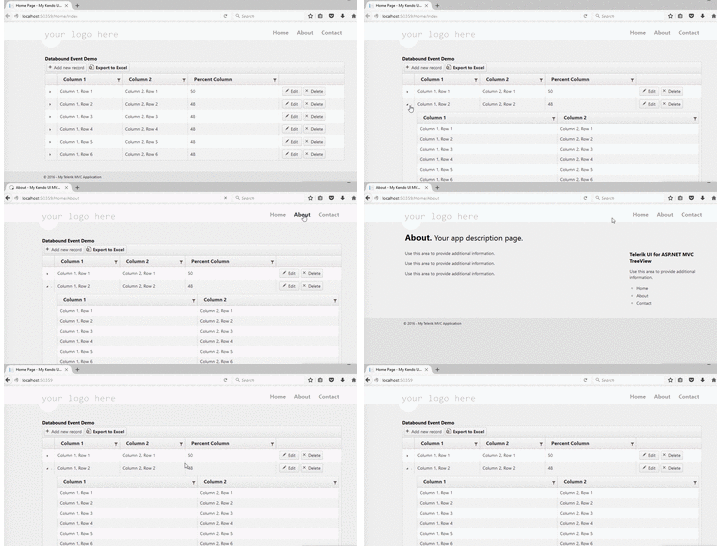
When you put it all together it looks like this:

After

Notice that when you navigate back to the grid page, it retains the expanded grid.  This example was a simple one where we only stash the last expanded row.  However, it would be trivial to modify this code to retain all expanded rows.

Here is what the view looks like when you have it all together.

 1
2
3
4
5
6
7
8
9
10
11
12
13
14
15
16
17
18
19
20
21
22
23
24
25
26
27
28
29
30
31
32
33
34
35
36
37
38
39
40
41
42
43
44
45
46
47
48
49
50
51
52
53
54
55
56
57
58
59
60
61
62
63
64
65
66
67
68
69
70
71
72
73
74
75
76
77
78
79
80
81
82
83
84
85
86
87
88
89
90
@{
ViewBag.Title = "Home Page";
}

<div class="container">
<div class="row">
<h4 class="page-header">Databound Event Demo</h4>
</div>
<div class="row">
<div id="PercentError" class="alert alert-danger" style="display: none;"></div>

@(
Html.Kendo().Grid<KendoUIGridEventsBlog.Models.DemoModel>()
.Name("Grid_1")
.Columns(columns =>
{
columns.Bound(p => p.id).Hidden(true);
columns.Bound(p => p.Column1).Title("Column 1");
columns.Bound(p => p.Column2).Title("Column 2");
columns.Bound(p => p.dPercentColumn).Title("Percent Column");
columns.Command(command => { command.Edit(); command.Destroy(); }).Width(210);
})
.ToolBar(tools =>
{
tools.Create();
tools.Excel();
})
.Sortable()
.Editable(editable => editable.Mode(GridEditMode.InLine))
.Filterable()
.Resizable(resize => resize.Columns(true))
.Events(events => events.DetailExpand("GridExpanded").DataBound("ExpandStashedSite"))
.DataSource(datasource => datasource
.Ajax()
.Model(model =>
{
model.Id(p => p.Column1);
})
.Read(read => read.Action("Demo_Read", "Home"))
.Create(create => create.Action("Demo_Create", "Home"))
.Update(update => update.Action("Demo_Update", "Home"))
.Destroy(update => update.Action("Demo_Delete", "Home"))
)
.ClientDetailTemplateId("DrillInTemplate")
)
</div>

<script id="DrillInTemplate" type="text/kendo-tmpl">
@(
Html.Kendo().Grid<KendoUIGridEventsBlog.Models.DemoModel>()
.Name("Grid_DrillIn")
.Columns(columns =>
{
columns.Bound(p => p.Column1).Title("Column 1");
columns.Bound(p => p.Column2).Title("Column 2");
})
.Sortable()
.Filterable()
.DataSource(datasource => datasource
.Ajax()
.Model(model =>
{
model.Id(p => p.Column1);
})
.Read(read => read.Action("Demo_Read", "Home"))
).ToClientTemplate()
)
</script>

</div>

<script type="text/javascript">

function GridExpanded(e) {
$.post("@Url.Action("SetExpandedRow", "Home")", { rowident: e.sender.dataItem(e.masterRow).id });
}

function ExpandStashedSite(e) {
var grid = $("[id^='Grid_1']").data("kendoGrid");
var data = grid.dataSource.data();
var len = data.length;

for (var i = 0; i < len; i++) {
var row = data[i];
if (row.id == '@string.Format("{0}", Session["ExpandedRowId"] )') {
grid.expandRow("tr[data-uid='" + row.uid + "']"); // expands the row with the specific uid
}
}
}
</script>

Kendo UI Grid - Sum a Column on Load

While working on a recent project I came across a need to sum a specific column of the Kendo UI Grid in my application after it loaded.   Specifically, I had a grid where one column of each row was the “Percent of Total”.  What the client requested, was that a message be displayed at the top of the screen whenever the sum of that column in all the rows of the grid did not equal 100%.


My first thought, was that I would handle this server side.  I could calculate the sum before I ever sent the data to the view.  Drop that sum in ViewData and I would be off to the races.


The problem with this approach is that in this project I was utilizing the excellent inline edit capabilities of the Kendo UI Grid.  This meant that the user could add a new row without the screen refreshing.  Without that server round trip, I could not be sure what I was showing the user was correct.  I needed something client side!

Read more

TrumpTexting.com

Recently I was chatting with some developer friends and we happened across an idea for a fun little web app that we instantly knew would have to be written.  We were discussing how crazy the current US Presidential election cycle seems to be this year and we were lamenting the seemingly outlandish things one specific candidate was getting away with saying.

The idea was to build a web/mobile application that would allow you to send your friends/enemies anonymous text messages containing a sampling of the crazy quotes Donald Trump has uttered in this election cycle.  

Politics aside, I instantly knew this would be a cool project to get up and running quickly and would allow me to explore some cool technologies.  I had some criteria that I wanted to meet before I set out to create the app.

  1. I wanted it coded/tested/deployed in under 6 hours
  2. I wanted to spend less than $100
  3. I wanted it to be awesome
  4. I wanted every quote to be legitimate.  Each quote must be cited.
  5. I wanted it to be completely anonymous. The receiver can not be aware of the sender.
  6. I wanted the receiver to be aware of when the other party received each message.
  7. I wanted the sender to be aware of any responses from the receiver.

The app is now up and running and you can check it out at: https://www.trumptexting.com

I think I came pretty close!  For criteria 1, I went slightly over my 6 hour constraint ending up at 7 hours, but I can live with that.

Getting a usable site up and running, even an admittedly small one, is an accomplishment.  This couldn't have been done in such a short time frame had it not been for building on platforms and services that are readily available.  Building on the shoulders of giants.  

I plan to write a series of posts outlining the details of how TrumpTexting.com was built.  However, to get things started here are the technologies used.

The number of libraries and services free to anyone on the net is truly astounding.  The barrier to entry for building production ready applications, not just trivial quote sending apps, is very low and getting lower all the time.  

Build something!

Update: A Better Way to Make a Read Only column in Kendo UI Grid Edit Mode

Shortly after hitting publish on my last blog post, I received an email from Lohith (https://about.me/kashyapa), a Technical Evangelist with Telerik in India.  He had seen my post and pointed me to the documentation that allows for a much easier method of accomplishing this task.  This is yet another example of why Telerik is such an awesome company and I am more than happy to hand over my money for a superb set of development components.

Read more

Make a Read Only column in Kendo UI Grid Edit Mode

When it comes to JavaScript and HTML 5 web application components there is absolutely none better than Kendo UI (http://www.telerik.com/kendo-ui).  Kendo UI is not cheap and there can be a slight learning curve, but it is a spectacular piece of software.  If you work in ASP.net MVC then spend the money and buy the server extensions.  Amazing.

Read more

PetaPoco – Tips and Tricks

Deciding on a data layer for your application is one of the most important decisions you will make and there is no shortage of viable options.  In the .NET world you have full fledged ORM’s such as Entity Framework or NHibernate.  There are also a large number of micro-ORM’s that solve many of the pain points of writing your data layer directly while still allowing you to manually control the actual SQL used.  Last, you always have the option of rolling your own, though there are many reasons why this is not usually the right choice.  

Read more